
Update: we made also a WebGL version!
The Sub® is part beer cooler and beer drafter made by Heineken in partnership with Krups. The concept is similar modern coffee machines in that this device will allow for you to insert a “cartridge” of beer , keep it cold and you can poor yourself a glass at home like a pro.
Visit this site for more info.
As I write this, a popup store called The Sub®Store is displaying this device in all manners and colors in Paris and will close the 20th of December.
For this event, we were asked to develop one of several apps that would help showcase the device in the store. Our app would display some of the technical aspects of the device, its inner workings such as how the beer would come out, at what temperature, and how it is kept cold.
We worked for Megalo who designed the app’s UI and UX and all 2D assets. We also worked with GHiOM who created the 3D models used in this app.
The following video shows the app in action.
The Sub by Heineken from Da Viking Code on Vimeo.
This 3D technical drawing that you can manipulate has been amazing to help create.
Inside that 3D model, some “hotspot” points you can click can trigger events where the camera zooms into a specific position to show more details on a given process/detail by showing some descriptive text or animations.
This would run on a single type of device, an ipad air 2, and was created with Unity.
Wireframe and x-rays
Let’s talk about the 3D. What we had to work with was a full 3D model of the outside and inside of the device, optimized thankfully but still high quality. The mockups were mainly rasterized vector files, very close to technical / blueprint drawings, and we had to get as close to this result as possible. But then, to highlight objects we were going to have some kind of effect on objects, and “x-ray” was the term being used, wireframe was the term used to explain how the full device should appear on screen.
However “wireframe” is deeply misleading cause this means showing each vertices of an object, where the mockup was showing something closer to a hand drawn device where lines and curves were drawn only when necessary. By that I mean something closer to manga drawing if you will. To summarize, lines and curves drawn on screen, had to depend on the point of view of the object. That’s it. No wireframe… Just an outline effect dependent on the camera’s position and viewing angle.
With that in mind, we got ShaderForge out for the first time, and this was an amazing tool.
First and foremost, the outline effect is here by default! So there was nothing to worry about on that part. Although some curves on the technical drawings were not outlines and drawn explicitly to show tight, hollowed “lines” in the device that went around it. For some lines that needed to be there, we didn’t rely on the outline effect, but rather full polygonal , solid colored objects to create lines. This did the trick perfectly and gave us the perfect result to be between outline and full wireframe. in fact let’s call that outline and selective wireframe.
There might be a shader for that. Though in this case, it was just easier, and the result was as nice, to create “real” lines on top of the objects.
Now there’s that x-ray effect for some highlighted objects. This too, would depend on the camera angle. We simply used a Fresnel shader.
Though there are more shader types than you can imagine here… There is one shader that could be used for all materials in the scene (I didn’t end up doing that but I know its possible). This obviously helps for rendering, but when a hotspot was clicked, we had to go in “single object view” let’s say. And that means “fading away” all other object.
To successfully do that. Material properties are simply being lerped (with easing) to a different material’s properties (as long as property names are the same).
Unity provide an easy way to lerp materials with Material.Lerp in fact. But we had created our own lerping system before shaders got merged progressively.
So I cannot say what Material.Lerp does, it should perform better than our solution but our solution worked fine.
One thing to note though. To lerp from one color to another on the material, there was an issue where a color , instead of going from dark green to a lighter green , would lerp down to an even darker green before going to the lighter green (as if we used a 3 ‘keyframe’ gradient) – not what one expects at all as the Unity Gradient object did not have this problem. So for color lerping we used the following function found somewhere in a Q/A forum (thank you !) :
public static Color ColorLerp(Color a, Color b, float t = 0.5f)
    {
        float aR = a.r;
        float aG = a.g;
        float aB = a.b;
        float aA = a.a;

        float bR = b.r;
        float bG = b.g;
        float bB = b.b;
        float bA = b.a;

        float cR = Mathf.Sqrt(aR * aR * (1.0f - t) + bR * bR * t);
        float cG = Mathf.Sqrt(aG * aG * (1.0f - t) + bG * bG * t);
        float cB = Mathf.Sqrt(aB * aB * (1.0f - t) + bB * bB * t);
        float cA = Mathf.Sqrt(aA * aA * (1.0f - t) + bA * bA * t);

        return new Color(cR, cG, cB, cA);
    }
Filling up a tube
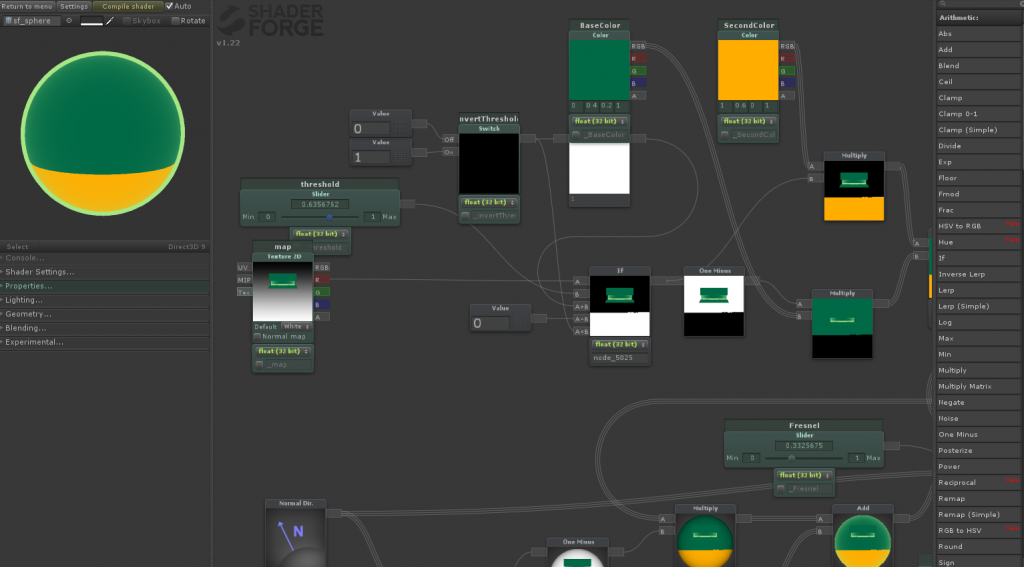
There was one really interesting challenge but it was solved in less than half an hour. Some virtual liquid had to fill a 3D tube (twisted cylinder) you might see that at 0:35 in the video, and you can see a bit of the shader involved in the ShaderForge screen capture above. Basically, a gradient texture was mapped to the tube so that it started white at the start of the tube, and black at the end. From that with the help of the visual ShaderForge editor, it was really fast to build up the logic that I knew would work in code anyway but didn’t want to struggle with shader code at that point… have a threshold value to be tweened between 0 and 1, anything above that value compared to a single channel value on that texture, would be a certain color, everything below would be a different color. tweening linearly the threshold value simply makes one color rise up linearly too on that object because there is a gradient.
That simple quick idea came up because I started writing shader code by hand earlier and tried that “dissolve” effect where instead of having two colors you have the texture or transparency and instead of a gradient mapped to the object, you get perlin noise for example. I’m sure with such simple concepts you could get very cool effects, and ShaderForge helped achieve that in a situation where the idea was here but time for coding it was not.
Camera movement, gimbal lock vs. non gimbal locking camera orbit
A reminder, the object doesn’t move, the camera does.
If you ever do a similar project, it’s your choice after all, all that changes is the relative point of view – I’m sure this app could have been done by having a static camera. But I decided to go for an orbiting camera. Also, the camera had to move in/out of some specific positions/rotations in the world (the single object views after clicking a hotspot). These movements are built on the fly with bezier curves…. So it’s possible to sometimes clip inside the object while moving though it doesn’t affect the experience.
Anyway, orbiting the object I guess was the biggest part of the app, the part that was reworked a lot at least.
It first started with a simple camera orbit scenario, where the touch position would affect two rotational axis. There was no zoom in/zoom out movement at the time. So basically 2 axis of control for the rotation and no “tilt”… to avoid gimbal locking here since I used euler angles and tracked them as properties seperate from the Quaternions, well we would limit the possible “latitude” of the rotation (I was thinking of it as moving the camera on a globe, I though, X,Y for the touch, so Longitude/Latitude for the positions on the sphere).
This did work for some time. But we were asked to be able to move the object around at any possible angle. Of course this meant non gimbal locking “camera orbit” but this also meant a control by touch similar to a trackball and affecting a new axis on the camera’s rotation. So no more euler angles, full Quaternion all over the place.
Since we are not actually using that solution , here it is explained :
On any given Touch event (movement of a touch down) we have the camera to center vector, where center is an arbitrary center of orbit point.
From that we want the tangent plane to the sphere we’re orbiting “on” . given the camera looks at the center always, we have it, it could be defined by the camera’s up and right vector. It’s kind of like the screen being projected on the sphere actually (well its exactly that I guess). from that we can control all axes of the rotation and position of the camera to get the effect similar to trackball, although I did not project the touch position on a sphere to get a trackball effect where the further you go from the center the less rotation you get, that was not the point.
Anyway, you could start from looking at the front of the object. to looking at its side by sliding horizontally. Then sliding vertically to a full 360 around it in the direction you were in. Exactly what you’d expect if you have an object floating in front of you and you could control its every direction.
Although, that extra level of freedom did cause some issues. It was harder to control, to keep the object “level”. So basically we reverted back. It was not necessary for the presentation to be able to play around with it in every direction like an inspectable object in resident evil, in fact it was more distracting and frustrating than anything, possibly leading away users from the experience.
In conclusion
Well this was a very interesting app to create, a lot of UI stuff that needed to be done and thankfully Unity handled it very well and managing UI is getting very easy. Discovering ShaderForge was amazing too, there probably are some redundancies in the shader given some simple operation actually exist as nodes of themselves and I probably replicated them with more nodes than I should’ve, Material.Lerping was very interesting to work on even though Unity does provide a way to do that yourself – it did improve my understanding of unity’s ShaderLab language even though I wasn’t directly touching it, and overall 3D rendering with some special effects. One thing I didn’t mention, we’ve got an internal view of the object always so there’s lots to say about depth buffers here! The Color problem was really weird, I hope that function helps people… in the end you could use a Gradient object and Evaluate() it – that would’ve been my last solution if it weren’t for that function. And thanks to GHiOM, the artist that worked on this 3D model and helped with the back and forth of ideas on the final rendering results (and also had to cut and add some stuff to his model because of us and some weird artifacts the outline effect could have).
2 thoughts on “Heineken’s popup store “The Sub®Store” app”